Product Categorization API Part 3: Creating an API
This post is part 3—and the last—of the series on building a product classification API. The API is available for demo here. Part 1 and 2 are available here and here. (Github repositiory)
Update: API discontinued to save on cloud cost.
In part 1, we focused on acquiring the data, and cleaning and formatting the categories. Then in part 2, we cleaned and prepared the product titles (and short description) before training our model on the data. In this post, we’ll focus on writing a custom class for the API and building an app around it.
This is part of a series of posts on building a product classification API:
- Data acquisition and formatting (part 1)
- Data cleaning and preparation (part 2)
- API development (part 3)
- Image classification demo
- Image search demo
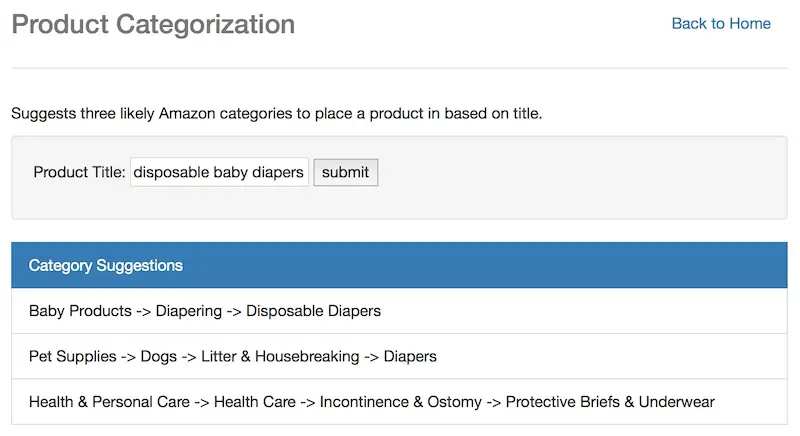
The desired end result is a webpage where users can enter a product title and get the top three most appropriate categories for it, like so.

Input: Title. Output: Suggested categories.
Creating a TitleCategorize Class
In most data science work using Python, we seldom have to write our own data structures or classes. Python is rich in useful data structures like dicts, sets, lists, etc. Also, thanks to Wes McKinney, most data wrangling can be done with one main data structure/class, the pandas dataframe.
For the API, what data structure should we use?
We can continue to use the pandas dataframe and perform all our operations on it. However, we don’t need something so heavy duty (with fast indexing, joins, etc). Perhaps we should write our own class instead.
Before writing any code, lets think about how we expect the API to work:
- User provides a title as input
- Title is cleaned and prepared via the approach described in post 2 (title preparation for new input titles should be the same as in model training process)
- Prepared title is provided as input to classification model
- Classification model returns top x categories and associated probabilities
Based on the above, this is what our CategorizeTitle class should do:
- Take a title string as input
- Clean and prepare title string
- Input prepared title string to classification model
- Return results from classification model
- Looks simple enough. Here’s how our class looks like:
class TitleCategorize:
    """
    Class to predict product category given a product title.
    """

    def __init__(self, title):
        self.title = title

    def prepare(self, excluded='-.'):
        """ (str) -> list(str)

        Returns the title after it has been prepared by the process from clean titles

        :return:
        >>> TitleCategorize('Crème brûlée " &  ').prepare()
        ['creme', 'brulee']
        >>> TitleCategorize('test hyphen-word 0.9 20% green/blue').prepare()
        ['test', 'hyphen-word', '0.9']
        >>> TitleCategorize('grapes come in purple and green').prepare()
        ['grapes', 'come']
        >>> TitleCategorize('what remains of a word ! if wordlen is 2').prepare()
        ['remains', 'word', 'wordlen']
        """

        self.title = encode_string(self.title, HTML_PARSER)
        self.title = self.title.lower()
        self.title = tokenize_title_string(self.title, excluded)
        self.title = remove_words_list(self.title, STOP_WORDS)
        self.title = remove_numeric_list(self.title)
        self.title = remove_chars(self.title, 1)
        self.title = singularize_list(self.title)
        logger.info('Title after preparation: {}'.format(self.title))
        return self

    def categorize(self):
        """ (CategorizeSingle(str)) -> dict

        Categorizes prepared title and returns a dictionary of form {1: 'Cat1', 2: 'Cat2', 3: 'Cat3}

        :return:
        >>> TitleCategorize('This is a bookshelf with wood and a clock').prepare().categorize()
        {1: 'Electronics -> Home Audio -> Stereo Components -> Speakers -> Bookshelf Speakers',
        2: 'Electronics -> Computers & Accessories -> Data Storage -> USB Flash Drives',
        3: 'Home & Kitchen -> Furniture -> Home Office Furniture -> Bookcases'}
        """
        result_list = get_score(self.title, model, 3)
        result_dict = dict()
        for i, category in enumerate(result_list):
            result_dict[i + 1] = category

        return result_dict
Here’s a breakdown of the class methods:
- Init method initialises the class with the title string provided
- Prepare method… well, prepares title string via encoding, lowercasing, tokenizing, etc.
- Categorize method then inputs prepared title to the classification model and returns results in a dictionary
Wrapping it in a class
We can further simplify the use of the TitleCategorize class by wrapping it in a function. This allows usage of the class via a simple function call, as well as wrap the class with other utility functions (such as a time logger).
@timer
def title_categorize(title):
    """ (str) -> dict

    Initializes given title as Title class and returns a dictionary of top 3 options.

    :param title:
    :return:
    """
    result = TitleCategorize(title).prepare().categorize()

    return result
Timing how long the API takes
If you’ve used the product classification API (here), you’ll notice it displays the time taken to return a result. Code profiling and logging can be useful in improving and monitoring the performance of an API.
One way to log the time is by adding code to track the start time and end time of the function, and the getting the difference. Something like this:
def title_categorize(title):
    """ (str) -> dict

    Initializes given title as Title class and returns a dictionary of top 3 options.

    :param title:
    :return:
    """
    start_time = datetime.datetime.now()
    result = TitleCategorize(title).prepare().categorize()
    end_time = datetime.datetime.now()
    elapsed_time = end_time - start_time
    elapsed_time = elapsed_time.total_seconds() * 1000
    logger.debug('Time taken: {} ms'.format(elapsed_time))
    return result
However, if you have multiple APIs, this mean duplicating this “timer” code for each API, violating the DRY (Don’t repeat yourself) principle. It also adds a lot of code to your wrapper functions. And what if you decide to change the time format? You’ll have to edit as much “timer” code as you have wrapper functions.
Fortunately, Python’s decorators allow us to write a utility timer once, and decorate our functions with it. This explains the @timer in the title_categorize() function above. Here’s how the timer decorator looks like:
def timer(function_to_time):
    """
    Decorator that times the duration to get result from function

    :param function_to_time:
    :return:
    """
    def wrapper(*args, **kwargs):
        start_time = datetime.datetime.now()

        result = function_to_time(*args)

        end_time = datetime.datetime.now()
        elapsed_time = end_time - start_time
        elapsed_time = elapsed_time.total_seconds() * 1000
        logger.debug('Time taken: {} ms'.format(elapsed_time))

        return result, elapsed_time

    return wrapper
Building the (Flask) app
Okay, the class and wrapper function required for the product classification API are created. Next, how can we expose it in a user friendly manner?
One way is to build a simple Flask app. Flask makes it easy to quickly create web applications. I won’t go into the details of Flask in this post—you can find out more here.
Writing the routes (i.e., URLs)
First, we’ll need to create the routes.py. This is where you list URLs for your web app. For now, we’ll just have the home page (/) and product classification page (/categorize_web).
@app.route('/')
def index():
    return render_template('index.html')

@app.route('/categorize_web', methods=['GET', 'POST'])
def categorize_web():
    """

    Returns top three category options for the title in web.
    If input form is empty, returns result suggesting user to type something in input form.

    :return:
    """
    if request.method == 'POST':
        # Read the posted values
        _title = request.form['title'].encode('utf-8')  # encode to utf 8
        logger.info('Title form input: {}'.format(_title))

    else:
        result, elapsed_time = {0: 'Type something in the product title field.'}, 0

    return render_template('categorize_web.html', result=result, elapsed_time=elapsed_time)
How the categorize web route works is simple. If a user has entered and submitted a title, the title_categorize function is called with the title as input, and the result returned in categorized_web.html. If it is the user’s first landing on the page (and no title is submitted), a GET request is triggered and a placeholder result is returned.
Many scenarios can occur on this page. What if the user presses submit without entering a title? What if there’s no result for the title provided? With some simple logic, you can handle these cases—I’ve not included them here to keep things simple.
Trivia: Why is the url categorize_web instead of simply categorize? I had initially built the API as a HTTP POST only API to be accessed vial curl—this original API has the url categorize.
Creating a shiny front-end
After setting up the routes, we’ll also need to set up the HTML for each of the urls. Writing about HTML could make up an entire piece on its own, and there are many good blogs out there. This post will not cover the HTML aspects of datagene.io (and I’ll probably not write about HTML ever).
The HTML for datagene.io was not too difficult to set up, and is mainly based on bootstrap.
3, 2, 1, Blast off!
TitleCategorize class? Check.
Flask app? Check.
HTML? Check.
Now we’re ready to start our API. Flask makes starting the API simple. All you have to do is import the app, and start it like so:
from app.routes import app

if __name__ == '__main__':
    app.run()
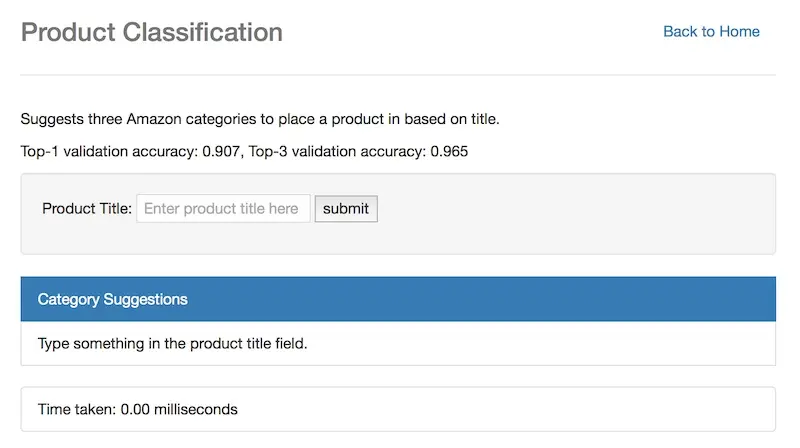
Your product classification API will then be running on localhost:5000. Here’s how it might look like:

SWEET!
Conclusion
And there you have it—how to create your own product classification API and expose it.
For the sake of simplicity, we did not cover the machine learning aspects of building a product classifier. There are many good articles on machine learning available and there was no need to duplicate content.
In addition, we didn’t cover how to expose the API on the web. To do so, you’ll need to set it up on a web server (I use AWS) and expose the port. Sounds simple, but I found it trickier than initially thought.
I hope you enjoyed and learned from this three-part series. Any feedback is welcome!
If you found this useful, please cite this write-up as:
Yan, Ziyou. (Feb 2017). Product Categorization API Part 3: Creating an API. eugeneyan.com. https://eugeneyan.com/writing/product-categorization-api-part-3-creating-an-api/.
or
@article{yan2017api,
  title   = {Product Categorization API Part 3: Creating an API},
  author  = {Yan, Ziyou},
  journal = {eugeneyan.com},
  year    = {2017},
  month   = {Feb},
  url     = {https://eugeneyan.com/writing/product-categorization-api-part-3-creating-an-api/}
}
Share on:
Browse related tags: [ machinelearning production python 🛠 ] or
Join 11,800+ readers getting updates on machine learning, RecSys, LLMs, and engineering.